


 English (EUR)
 Français (EUR)
 Deutsch (EUR)
 Español (EUR)
 Česky (CZK)
 Polski (PLN)
 Slovensky (EUR)
 български език (EUR)
 Magyar (HUF)
 Română (RON)
 Italiano (EUR)
DeLonghi ETAM series upper brewing piston replacement
Service Technician at Brewive • 2026-05-09 • 4 min read
What you need
Difficulty: Moderate | Estimated time: 15–30 minutes
Tools
- Phillips #2 screwdriver
- Plastic pry tool
- 4 mm Allen key
Step-by-step repair guide
Step 1


⚠️ Caution: Disconnect the power plug and remove the mains cord from the machine.
Empty the bean hopper of all coffee beans. Remove all detachable components — drip tray, milk frother, and water tank. Open the service door and withdraw the brew unit.
Unscrew the two Phillips screws.
The Phillips screw beneath the water tank can remain in place.
Step 2


The bean hopper flap must be removed. It is latched on the left and right, with each latch held under tension by a spring. Compress the spring until the catch releases, then lift the flap off.
Step 3


Beneath the flap there is a plastic cover strip. It is only snap-fitted in place. Release it with a flat pry tool and lift it out.
Step 4


Lift the rear panel upward and set it aside.
Step 5


The side covers are still fastened to the rear panel with two screws. These screws sit under a cover strip that is only snapped into place. Remove the cover strip and set it aside.
Unscrew the two Phillips screws.
Step 6


Push the left side panel rearward by about 1 cm. It often fits very tightly; use a plastic pry tool to help ease it free.
Remove the left side panel.
Step 7

The right side panel is removed in the same way, but the service hatch obstructs it slightly. Open the hatch first and push the side panel rearward a few millimetres. This is often tight, and you will need a plastic pry tool.
Close the hatch again and continue pushing the panel rearward. This step is somewhat fiddly — work carefully. Then lift out the side panel.
Step 8


Some models feature a cup-warming plate. Disconnect the flat (spade) connectors on the green/yellow protective-earth conductors.
⚠️ Caution: During reassembly, do not forget to reconnect these earth conductors.
Step 9


The top cover is secured with screws on the left and right (exact positions vary by model). Unscrew them.
The top cover can now be gently lifted off.
💡 Note: Depending on the model, the top cover may be shaped differently. On some variants the control panel sits far to the rear. Leave it in place for now — it is still connected by cables.
Step 10

💡 Note: The control panel is locked very tightly by four catches at the front. Releasing these latches is tricky and requires considerable force.
Begin by loosening the detent on the edge. Use a thin flat-blade screwdriver to slide under the latch from behind. Insert a sturdy plastic pry tool into the gap between the control panel and the front fascia. The latch releases with an audible snap.
Now open the remaining latches with the pry tool.
Do not fully remove the control panel yet — it is still connected by cables.
Step 11


Lift the control panel slightly. Press the latch on the white connector and pull the plug free.
Unthread as much of the ribbon cable leading to the control electronics at the rear as possible. This gives you extra length so you can rest the control panel on its side.
💡 Note: If you want to remove the control panel entirely, you must first take off the cover on the control-electronics board and disconnect the connector there. Only then can the cable be fully unthreaded.
Step 12


💡 Note: The upper brewing piston has six connections: three pressurised hot-water lines, one non-pressurised waste-water line, a hose leading to the coffee spout, and two cables to the microswitch. All of these must be disconnected first.
Pull out the retaining clip at the top left and detach the pressure line. Note the O-ring — it may remain on the fitting or on the line itself. When reassembling, replace it with a new O-ring if possible. Applying a thin coat of Lubricant for gaskets of the brew unit for coffee machines to the new O-ring will help ensure a reliable seal.
Pull out the retaining clip in the centre and detach the pressure line. Again, check for the O-ring — it may remain on the fitting or on the line. Replace it with a new one during reassembly if possible.
Pull out the retaining clip at the bottom left and detach the pressure line. As above, note the O-ring location and replace it with a new one during reassembly if possible.
Step 13

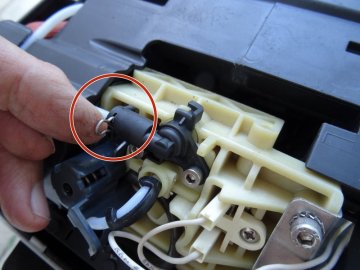
Disconnect the two spade connectors from the microswitch.
Step 14


Remove the black strain-relief sleeve on the centre pressure line.
Step 15


Unscrew the two Allen-head bolts (4 mm).
Lift off the stainless-steel bracket.
Step 16

Unscrew the Phillips screw on the black protective plate on the left and pull off the plate.
Step 17

Using a flat pry tool, disconnect the drain hose on the left side.
Step 18

Remove the two Phillips screws securing the upper piston mounting plate from the side.
💡 Note: The screws sit in deep recesses.
Step 19

Pull off the hose leading to the coffee spout.
Route the pressure hoses that are in the way out through the openings on the left.
The upper piston mounting plate is now free. However, it sits very tightly and can be tricky to extract. Be patient and work carefully. Make sure the ribbon cable to the control panel is not damaged during removal.
The job is easier if you also detach the front fascia and remove the coffee spout. When installing the new Mechanical valve / Piston for Autentica, apply a light film of gasket lubricant to all O-ring seals before reconnecting the pressure lines.
Mechanical valve / Piston for Autentica
Genuine spare part. In stock and ships within 24 hours from Brewive.
Ulka EP5 pump for DeLonghi coffee machines
Genuine spare part. In stock and ships within 24 hours from Brewive.
DeLonghi Descaler ECODECALK 500ml
We recommend descaling after every part replacement — protects the new component.
Lubricant for gaskets of the brew unit for coffee machines
Replace this seal whenever you swap the main part — otherwise you'll be doing the repair twice.
Conclusion
To reassemble your machine, work through the steps above in reverse order. Before reconnecting the pressure lines, inspect every O-ring gasket and replace any that show wear. A regular descaling routine using DeLonghi Descaler ECODECALK 500ml will help keep the thermoblock and internal waterways free of scale build-up, prolonging the life of the new piston and the brew unit as a whole.
Frequently Asked Questions
How difficult is it to replace the upper brewing piston on a DeLonghi ETAM series machine, and can I do it myself?
The repair involves multiple disassembly steps — including removing side panels, cover strips, and internal components — so it qualifies as a moderately advanced DIY job. If you are comfortable using Phillips screwdrivers and working with snap-fitted plastic panels, you can carry it out at home. You can find the correct replacement upper brewing piston for your DeLonghi ETAM series at Brewive.
What tools do I need to replace the upper brewing piston on my DeLonghi ETAM?
You will primarily need a Phillips #2 screwdriver, a 4 mm Allen key, and a flat pry tool (such as a flat-blade screwdriver or plastic spudger) for releasing the snap-fitted cover strips and latches. No specialised equipment is required. Brewive carries the replacement piston and can help ensure you receive the correct part for your specific ETAM model.
Do I need to remove the bean compartment and side panels just to replace the brewing piston?
Yes. The DeLonghi ETAM design requires you to remove the bean hopper flap, plastic cover strips, and both side panels before you can access the upper brewing piston. The side panels are held by screws hidden under snap-on cover strips, and the hopper flap is spring-latched on both sides. Brewive provides detailed guidance alongside replacement parts to help you through each step.
How do I know if my upper brewing piston needs replacing rather than just cleaning?
Common symptoms include coffee leaking inside the machine, weak or inconsistent espresso extraction, or the brew unit failing to seal properly during the infusion cycle. If thorough cleaning and reseating of the brew unit do not resolve the issue, the piston likely needs replacement. Brewive offers the correct replacement upper brewing piston designed for the DeLonghi ETAM series.
The side panel on my DeLonghi ETAM is jammed and won't slide off — what should I do?
This is a very common issue on the ETAM series; the side panels tend to jam tightly in their guides. Push the panel rearward about 1 cm while gently wiggling it, and apply even pressure to avoid cracking the plastic. A sturdy plastic pry tool helps distribute force safely. If you need replacement panels or the brewing piston itself, Brewive is your go-to source for compatible DeLonghi ETAM parts.