Nivona Caferomatica 838 Drainage valve replacement
Service Technician at Brewive • 2026-04-24 • 3 min read
If the coffee no longer flows properly, the drainage valve is often the cause. To access the drainage valve, the drive must be detached. This is shown here.
Note: Some images are from a different model. The slight visual differences do not affect the repair.
What you need
Difficulty: Moderate | Estimated time: 15-30 minutes
Tools
- Screwdriver Torx T10
- Flathead 3/32" or 2.5 mm Screwdriver
Step-by-step repair guide
Step 1

⚠️ Caution: Never forget: Unplug the power cord.
Remove all attachments: water tank, drip tray, coffee compartment lid. Remove all coffee beans.
Remove the service door and remove the brew group.
Step 2

The back cover is secured with five Torx T10 screws. Unscrew those.
Pull the back cover away from the bottom.
Remove the top cover


The top cover is locked in place in several places. The latches are quite difficult to open.
Insert a small flat screwdriver into the openings from below. Carefully push the catches on the side with the brew group, away until they release. At the same time, lift the top cover upwards.
Figure 2 shows the tab that the catch engages with.
Step 4


There are slots on the side with the water tank. Insert a screwdriver and push the latches away. At the same time, pull up the top cover at the back.
Lift the cover to about 30°. Then pull it out from under the front edge. It is quite stuck.
💡 Note: Do not remove the cover yet, as it is still connected to cables.
Pull the blade terminal connector off and remove the top cover.
Step 5


Lift the side panel on the water tank upwards to remove it.
Pull the silicone hose off the water tank.
Step 6

Lift the side panel on the brew group upwards and out.
Step 1
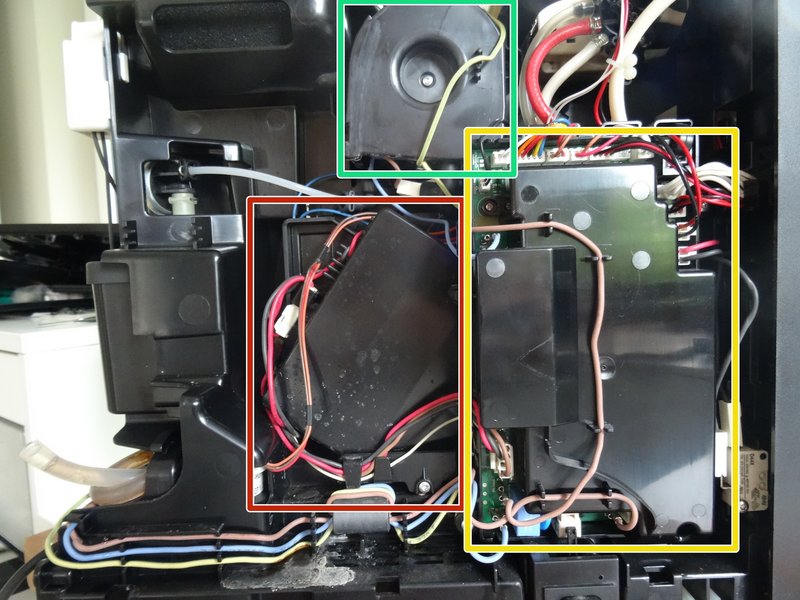
Here you can see the drive on the side with the water tank.
It is somewhat hidden under the electronics box. This must be detached and moved to the side.
To make the removal easier, the heater will also be detached; it is only attached with two screws.
Step 2

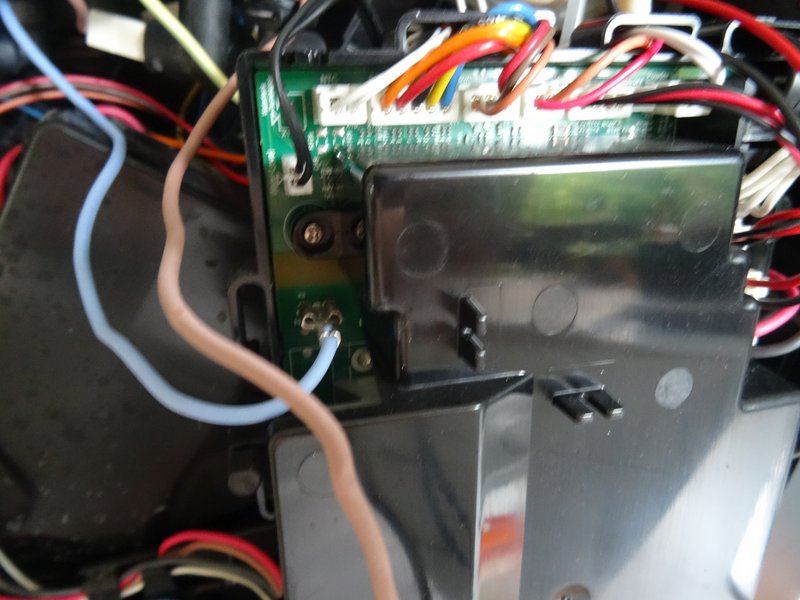

First, disconnect some cables on the left side of the electronics box so that you can position it to the right later. Most cables can remain connected. Take a photo so that you reconnect the cables correctly later.
Step 3


The electronics box is secured in three places with a Torx T10 screw. Unscrew the screws.
Slide the electronic box to the right to move it out of the way.
Step 4


The heater bracket is secured at the top with two Torx T10 screws. Remove these.
💡 Note: All heater connections can remain connected.
Remove the heater and move it out of the way.
Step 5

Turn the machine so that the side with the brew group is facing you.
Remove the five Torx T10 screws that secure the cover over the connection piece.
Remove the cover.
Step 6


Remove the Torx T10 screws that secure the drive.
The pressure hose from the heater is attached to the unit, more specifically to the drain valve, with a clamp. Pull the clamp toward you and slide the hose out to the left.
Step 7

Turn the machine back over so that the side with the water tank is facing you.
There is a retaining strip on the bottom edge of the drive. Remove the Torx T10 screw on the retaining strip and pull off the strip.
Step 8


Depending on the type of repair you are about to perform, you may need to disconnect the electrical connections on the drive. Take a photo so that you reconnect them correctly later.
There is a cover over the drive. You can remove it to access the microswitches. The cover is held in place by three clips, which can easily be loosened with a screwdriver.
Step 9


Now you can carefully remove the drive. Make sure that the drain valve is still stuck in a rubber hose at the bottom.
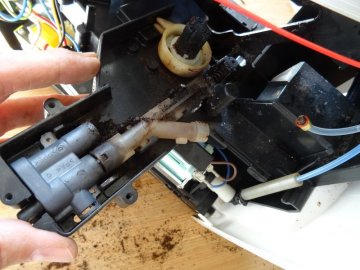
Step 1


The drain valve is positioned out in the open.
Press down on the spring at the bottom with a screwdriver and remove it.
Lift out the upper gray part of the valve. Push the light-colored part of the valve down slightly and lift it out.
Valve drain for Nivona / Siemens coffee machines
Order this genuine spare part for your Nivona coffee machine. Fast delivery and expert support from Brewive.
Pump SAP.HP4.V03 EU Nivona / Jura
Order this genuine spare part for your Nivona coffee machine. Fast delivery and expert support from Brewive.
Grinding stone for Nivona coffee machines
Order this genuine spare part for your Nivona coffee machine. Fast delivery and expert support from Brewive.
NIVONA Cleaning tablets NIRT701
Order this genuine spare part for your Nivona coffee machine. Fast delivery and expert support from Brewive.
Nivona Liquid Descaler NIRK703
Order this genuine spare part for your Nivona coffee machine. Fast delivery and expert support from Brewive.
Conclusion
Follow the steps in reverse order to reassemble your device.
Frequently Asked Questions
How do I know if the drainage valve is the problem with my Nivona Caferomatica 838?
If your coffee is no longer flowing properly or the machine has issues draining water during the brewing cycle, the drainage valve is often the culprit. Brewive offers replacement drainage valves specifically compatible with the Nivona Caferomatica 838 so you can get your machine running smoothly again.
What tools do I need to replace the drainage valve on my Nivona 838?
You will need a Torx T10 screwdriver to remove the back cover screws and a small flat screwdriver to carefully release the plastic latches on the top cover. You can find the replacement drainage valve and other parts for your Nivona 838 at Brewive.
Is it difficult to open the top cover on the Nivona Caferomatica 838?
Yes, the latches securing the top cover are quite difficult to release and require patience. You need to insert a small flat screwdriver into the openings from below and carefully push the catches away while lifting the cover upward. Take your time to avoid breaking the clips, and check Brewive for visual guides and replacement parts if needed.
Do I need to remove the brew group before starting this repair?
Yes, before disassembling the housing you should unplug the machine, remove all attachments including the water tank, drip tray, and coffee compartment lid, empty the coffee beans, and remove the service door along with the brew group. Brewive provides step-by-step guidance and all the replacement parts you may need for this repair.
Can I use this guide even if my Nivona model looks slightly different from the photos?
Yes, some images in the guide are from a different Nivona model, but the slight visual differences do not affect the repair procedure. The steps and overall layout are the same for the Caferomatica 838. If you need the correct drainage valve or any other parts, Brewive ensures compatibility with your specific model.