Brewing unit gasket replacement
Service Technician at Brewive • 2026-04-23 • 3 min read
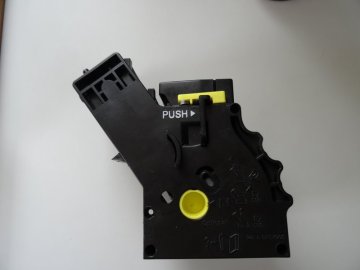
The gasket of the brewing unit has to withstand heavy usage. Especially the large O-Ring on the piston needs replacing from time to time. Follow this guide to replace the gasket.
These instructions may also help with coffeemakers from Philips and Gaggia - they are all made by the same manufacturer and have a very similar design.

What you need
Difficulty: Moderate | Estimated time: 15-30 minutes
Tools
- TR10 Torx Security Screwdriver
Step-by-step repair guide
Step 1


Open the hatch on the side panel and remove the brewing unit.
Step 2

💡 Note: The spout for the hot coffee is located on the top of the brewing unit. It is fastened with two screws. Underneath is the crema valve. It consists of a spring and a little glass ball. Make sure the spring is reinserted with the thin end touching the glass ball when re-assembling.
Remove the two Torx T10 screws on the crema valve.
Lift off the crema valve minding the spring and the glass ball.
Step 3

The upper piston is held in place in the frame with four locking pawls. Push down all four latches with a spudger, then remove the piston by pushing it downward.
💡 Note: If you want to replace the gasket, you can do this now and re-assemble the device and stop here. However, a general maintenance of the brewing unit is strongly recommended.
Unscrew the Torx T10 screw on the brewing sieve and remove it.
Step 4


There are three Torx T10 screws in deep blind holes that hold together the two parts of the brewing unit. Unscrew them and lift off the upper side panel.
Step 5


Now you can disassemble the brewing unit into its three main parts: the brewing unit and the two side panels.
Step 6


You can push out the lower piston from the brewing unit if you snap the deflection lever out of its socket with a screw driver.
Clean all parts with very hot water and dishwasher liquid.
Grease all moving parts with food grade silicone fat. Dont forget the tracks in the side panels.
Step 7


Take this opportunity to carefully replace the two O-rings on the support valve. The larger one is at the top. These two seals are stressed during every brewing process. Therefore, lubricate them with food-safe silicone grease.
On some models, the support valve is covered. In this case, you must unscrew the cover first.
O-ring for Saeco spout
Order this genuine spare part for your Saeco coffee machine. Fast delivery and expert support from Brewive.
O-ring ORM 0090-20 SILICON for Saeco spout
Order this genuine spare part for your Saeco coffee machine. Fast delivery and expert support from Brewive.
Saeco brew unit gasket
Order this genuine spare part for your Saeco coffee machine. Fast delivery and expert support from Brewive.
Vaseline 6g for the brew unit
Order this genuine spare part for your Saeco coffee machine. Fast delivery and expert support from Brewive.
Conclusion
Follow the steps in reverse order to reassemble your device.
Frequently Asked Questions
How do I know when the brewing unit gasket needs to be replaced?
Common signs include coffee leaking inside the machine, reduced brewing pressure, or water bypassing the coffee puck resulting in weak, watery coffee. If you notice any of these issues, it's likely time to replace the large O-ring on the piston. You can find the correct replacement gasket for your Saeco brewing unit at Brewive.
Will this guide work for my Philips or Gaggia coffee machine?
Yes, Saeco, Philips, and Gaggia espresso machines are made by the same manufacturer and share a very similar brewing unit design. This means the gasket replacement procedure is largely the same across these brands. Brewive carries compatible brewing unit gaskets for all three brands.
What tools do I need to replace the brewing unit gasket?
You'll need a Torx T10 screwdriver and a spudger (or similar flat tool) to release the locking pawls on the upper piston. Both are common tools, and Brewive may also stock maintenance kits that include the necessary accessories along with replacement gaskets.
Do I need to fully disassemble the brewing unit just to replace the gasket?
No, you don't have to. Once you remove the upper piston by releasing the four locking pawls, you can replace the gasket and reassemble without going further. However, the guide recommends performing a general maintenance of the entire brewing unit while it's disassembled — Brewive offers full maintenance kits to make this easy.
I'm reassembling the crema valve — does the orientation of the spring matter?
Yes, it's very important. The spring must be reinserted with the thin end touching the glass ball. Incorrect orientation can affect crema quality and brewing pressure. If your crema valve spring or glass ball is damaged, you can source replacement parts from Brewive.