


 English (EUR)
 Français (EUR)
 Deutsch (EUR)
 Español (EUR)
 Česky (CZK)
 Polski (PLN)
 Slovensky (EUR)
 български език (EUR)
 Magyar (HUF)
 Română (RON)
 Italiano (EUR)
Understanding the brew unit in a fully automatic coffee machine
Service Technician at Brewive • 2026-05-31 • 4 min read
How does a bean-to-cup coffee machine work? In this guide, we explore the inner workings of a fully automatic coffee machine, focusing on the most critical component: the brew unit.
Disassembly is demonstrated using a Jura machine as an example, but the general brew-unit operation described from Step 9 onward applies to virtually all fully automatic coffee machines.
By following this guide, you will gain a solid understanding of the brew unit in a fully automatic coffee machine and be better equipped to maintain a consistently great espresso at home.

What you need
Difficulty: Moderate | Estimated time: 15-30 minutes
Tools
- Oval head bit for opening Jura fully automatic coffee machines / Precision 4 mm screwdriver bit / 2.0 mm nut driver
- T15 Torx screwdriver
- T20 Torx screwdriver bit
- T10 Torx security bit screwdriver
Step-by-step repair guide
Step 1

These instructions are applicable to nearly every Jura model and similar machines from brands such as AEG and Krups.
⚠️ Caution: Unplug!
Remove the water reservoir.
Step 2


💡 Note: On the rear panel you will encounter an obstacle: four "oval head screws" that resemble rivets. They can only be removed with a dedicated oval drive bit. Jura uses these fasteners to deter end-user access to the machine internals.
Using an oval head bit, unscrew them. If you do not have one, you can carefully grip them with pliers. It is good practice to replace these oval screws with standard ones for easier future access.
💡 Note:
Beneath both top side covers you will find two Torx T15 screws. Remove them, then lift off the entire top cover. It may be snug — apply firm, even force if it resists.
The side covers must be slid rearward by approximately 1 cm. This can require some effort. If necessary, wedge a plastic prying tool into the gap between the side covers and the front panel. The rear cover lifts off easily.
Step 3

Slide the coffee funnel upward and lift it out. It often sits very tightly and requires a firm pull to free it.
If it is firmly locked in place, wiggling it back and forth will help loosen it. In some models it may also be secured with a screw.
Step 4
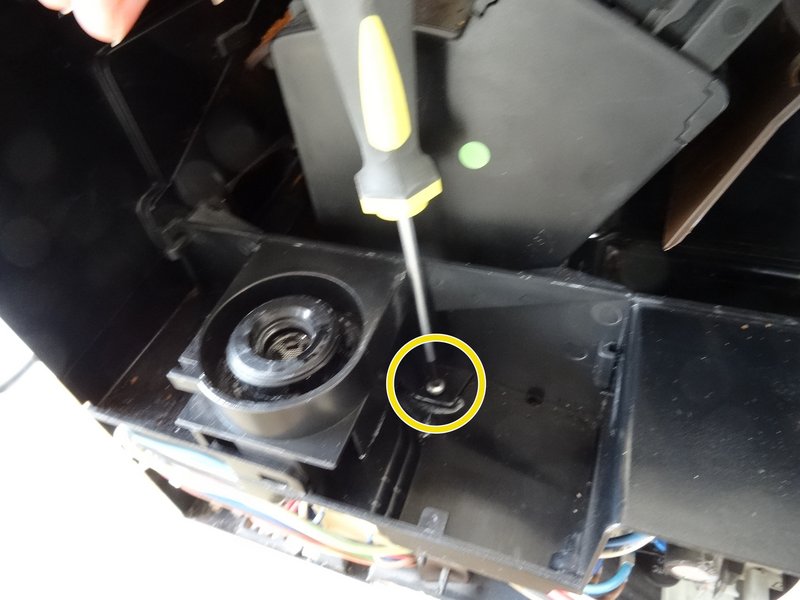

Remove the Torx T15 screw from the water inlet.
Lift the water inlet and pivot it to the side. The hose can remain connected.
Step 5


Pull out the retaining clamp on the pressure hose that runs between the steam valve and the brew unit.
Disconnect the pressure hose.
Step 6

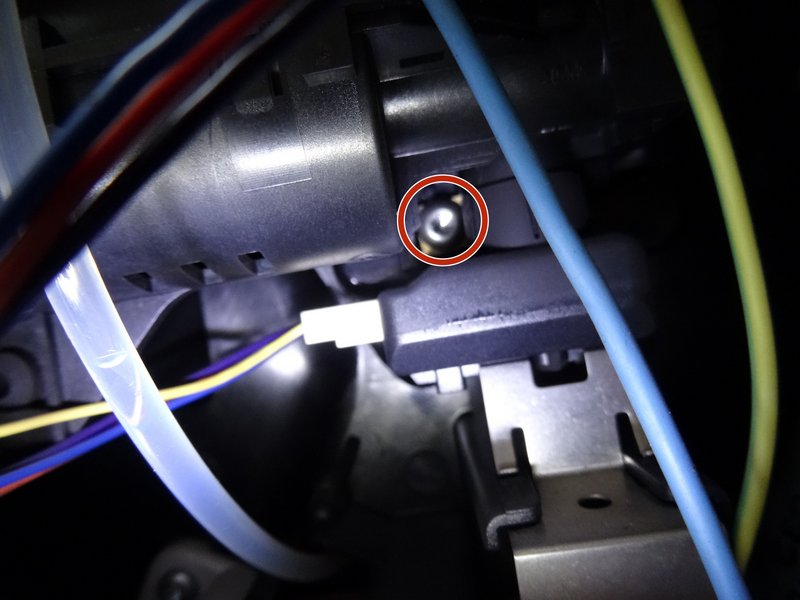
💡 Note: The brew unit is fastened from the motor side with two Torx T20 screws — one to the left and one to the right of the motor coupling. These are recessed deep inside the chassis.
Remove the right screw.
Remove the left screw.
Step 7

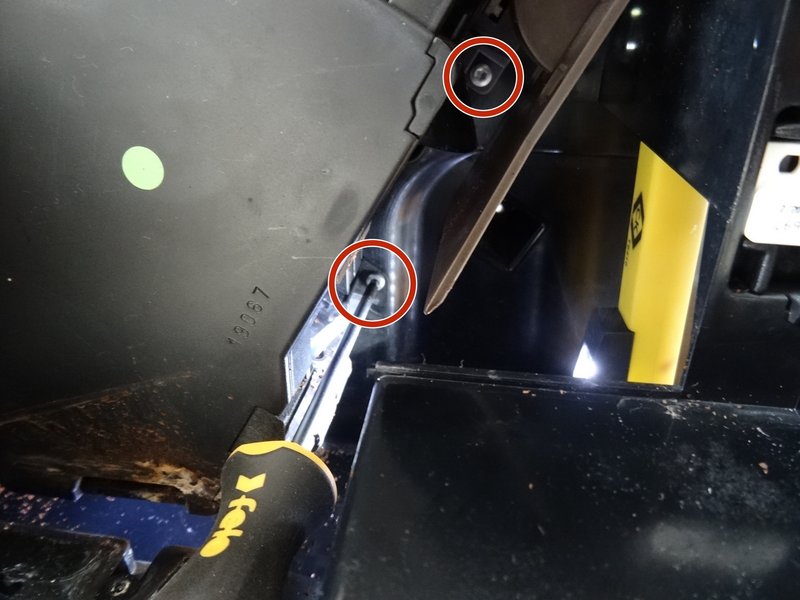
💡 Note: The brew unit travels up and down in a slide mechanism driven by an elongated rack. Four Torx T10 screws secure the slide. The top-left screw must remain in place.
The screw on the top left must remain.
Remove the screw on the bottom left.
Remove the screw on the bottom right and the one in the middle right.
Step 8

The brew unit is now free. Tilt it downward, but take care with the pressure hose — it must be guided through an opening. Then push the brew group slightly downward to lift it out of the chassis.
For further disassembly of the brew unit, refer to the detailed manual at brewive.com.
Step 9: Introduction to the Brew Unit
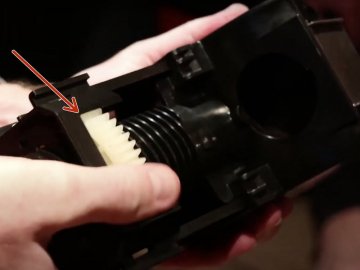
In the picture you can see the brew unit — also referred to by some manufacturers as the central unit or infuser. It is essentially the heart of every fully automatic coffee machine, comparable to the CPU in a computer.
When the gear wheel sits at the extreme end of the threaded spindle, the brew unit is in its zero position — meaning the infusion chamber is fully open.
Step 10


Ground coffee is fed into the brew unit through this opening.
Notice how the lid of the powder container gradually closes as the gear wheel is driven downward along the threaded spindle.
Step 11
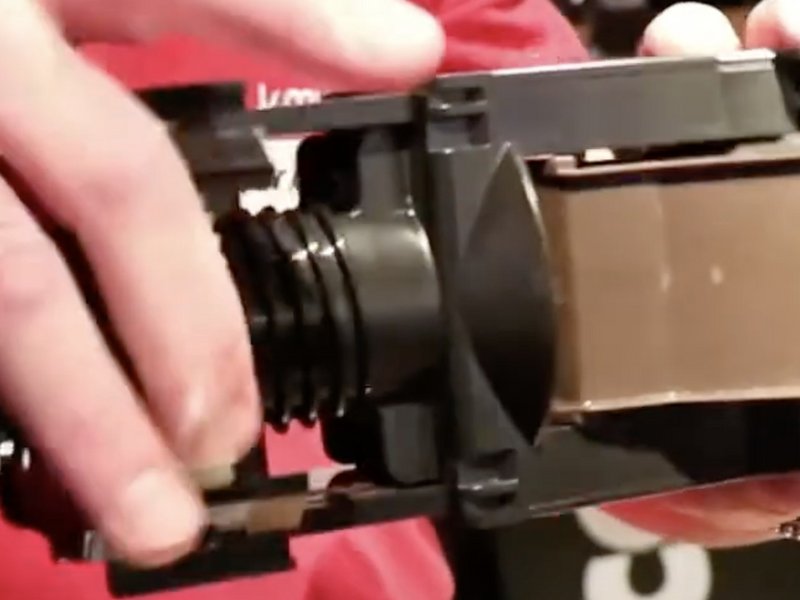


Simultaneously, the piston on the opposite side of the infusion chamber compresses the coffee grounds — this is the tamping stage.
Hot water under pump pressure is introduced at the point indicated by the finger in the second picture of this step.
The third picture shows the brew unit outlet from which the extracted espresso exits.
Step 12


The piston then travels back upward — the gear wheel reverses along the threaded spindle toward the zero position.
At the point indicated by the finger, the spent coffee cake is scraped outward and ejected into the drip tray grounds container.
As the cogwheel approaches the zero position, the powder container lid progressively reopens until it is fully open once the zero position is reached again.
The machine is now ready for the next brewing cycle.
Step 13: Importance of the Brew Unit

The brew unit plays a vital role in the coffee-making process of every fully automatic machine. It is responsible for compressing the grounds, forming an even coffee puck, and forcing hot water through it at the correct pump pressure to extract the full range of flavours and aromas from the coffee. To keep it running smoothly, periodically apply a thin layer of food-safe Vaseline 6g for the brew unit to the gaskets and O-rings. If the unit is worn beyond servicing, a complete Brew unit for Jura C-, D-, E-, F-, S- and X- replacement is available.
Remember that any repairs or maintenance performed on your fully automatic coffee machine are undertaken at your own risk and responsibility. Always exercise caution and disconnect the machine from the mains before starting work. If you feel you need assistance, consider visiting a local repair workshop where experienced technicians can provide guidance on servicing your coffee machine, including the brew unit.
Oval head bit for opening Jura fully automatic coffee machines
Genuine spare part. In stock and ships within 24 hours from Brewive.
Brew unit for Jura C-, D-, E-, F-, S- and X-
Genuine spare part. In stock and ships within 24 hours from Brewive.
Descaling tablets 36 pieces for Jura coffee machines
We recommend descaling after every part replacement — protects the new component.
Vaseline 6g for the brew unit
Genuine spare part. In stock and ships within 24 hours from Brewive.
Conclusion
To reassemble your machine, follow these instructions in reverse order.
Frequently Asked Questions
What is the brew unit and why is it so important in my fully automatic coffee machine?
The brew unit is the heart of your bean-to-cup coffee machine — it is the component responsible for compressing ground coffee and forcing hot water through it under pump pressure to extract espresso. If your brew unit is worn or malfunctioning, you will notice poor coffee quality, leaking, or error messages. Brewive carries replacement brew units, gaskets, and related parts to help you restore your machine to peak performance.
Does this guide apply to my specific coffee machine, or only Jura models?
While the disassembly steps are demonstrated on a Jura machine, the general operation of the brew unit described in this guide applies to most fully automatic coffee machines, including brands like AEG and Krups. If you need parts for your specific model, check Brewive for a wide selection of compatible brew unit components.
What special tools do I need to open my Jura coffee machine for brew unit access?
Jura machines use oval head screws that resemble rivets, requiring a dedicated oval drive bit to remove. You will also need a Torx T15 screwdriver for the fasteners beneath the top covers. Brewive stocks these specialty tools, or you can carefully grip the screws with pliers and replace them with standard fasteners afterward.
How do I know if my brew unit needs to be repaired or replaced?
Common symptoms include weak or watery espresso, the machine failing to complete a brew cycle, unusual noises during extraction, or coffee grounds appearing in your cup. Understanding how the brew unit operates — as outlined in this guide — can help you diagnose the issue. Visit Brewive to find replacement brew units, gaskets, and seals for your machine.
Can I perform a brew unit repair myself, or should I take it to a professional?
With the right tools and a guide like this one, many home users can successfully service or replace a brew unit themselves, saving significant repair costs. The key is to unplug your machine, work carefully, and follow the steps methodically. Brewive offers the replacement parts and components you need to complete the repair at home.