


 English (EUR)
 Français (EUR)
 Deutsch (EUR)
 Español (EUR)
 Česky (CZK)
 Polski (PLN)
 Slovensky (EUR)
 български език (EUR)
 Magyar (HUF)
 Română (RON)
 Italiano (EUR)
Sage SES880 Disassembly and Descaling
Service Technician at Brewive • 2026-04-22 • 3 min read
The instructions explain how to open the machine and which parts need to be descaled. Once the machine is open, you can access the pump and the control electronics. I didn't concern myself with the built-in grinder.
What you need
Difficulty: Moderate | Estimated time: 1 - 2 hours
Step-by-step repair guide
Opening the enclosure, Part 1


Remove the Water Tank.
Remove the screws.
Remove the hidden screw under the plug.
Remove the bean container


Close the bean container by turning the knob.
Lift off the closed bean container.
Remove any remaining beans from the housing using tweezers
Opening the enclosure Part 2
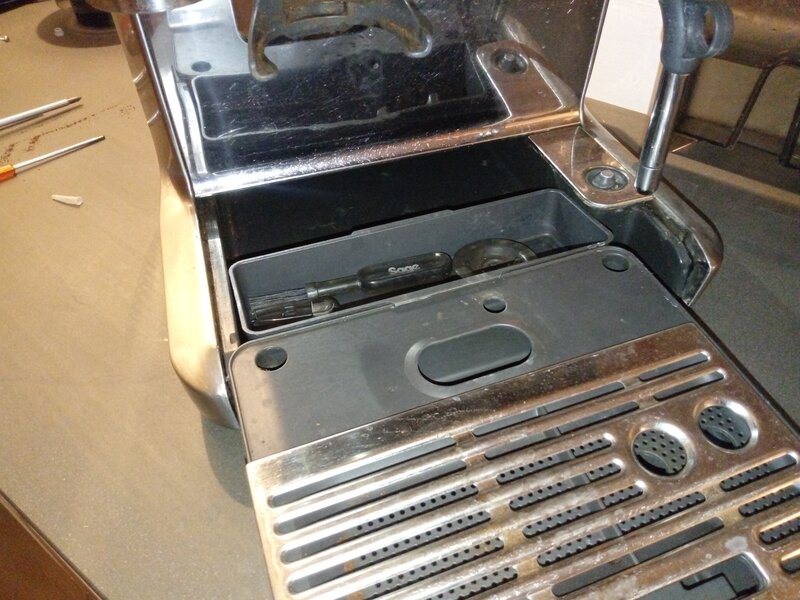


Remove the shell.
Pull the tamper down (magnet) and unscrew the hidden screw securing the lid.
On the right side, there is also a screw inserted from below that secures the lid.
Remove the lid


The lid can now be removed
⚠️ Caution: Watch out for the cable!
The connector for the bean hopper sensor can be unplugged
Heating element
Water inlet
Hot water outlet
Temperature sensor
Remove the back panel


Remove the two screws at the bottom
Pry open the three clips on each side. They are tight, but solid.
Overview of Internal Components


Magnetic switch for the water level in the tank. It can be unclipped.
Pump
The two-way valves are mounted on a metal plate. This metal plate is secured to the housing with two screws. To access the hoses on the back of the valves, the metal plate must be unbolted.
Uncover the heater


Unscrew the inlet and outlet fitting.
Remove the two screws securing the heating plate and the ground connection.
Heating plate contacts
Thermal fuse
To remove the hoses, use tweezers to pull out the split pin. Caution! Do not lose the small red O-ring
Descaling


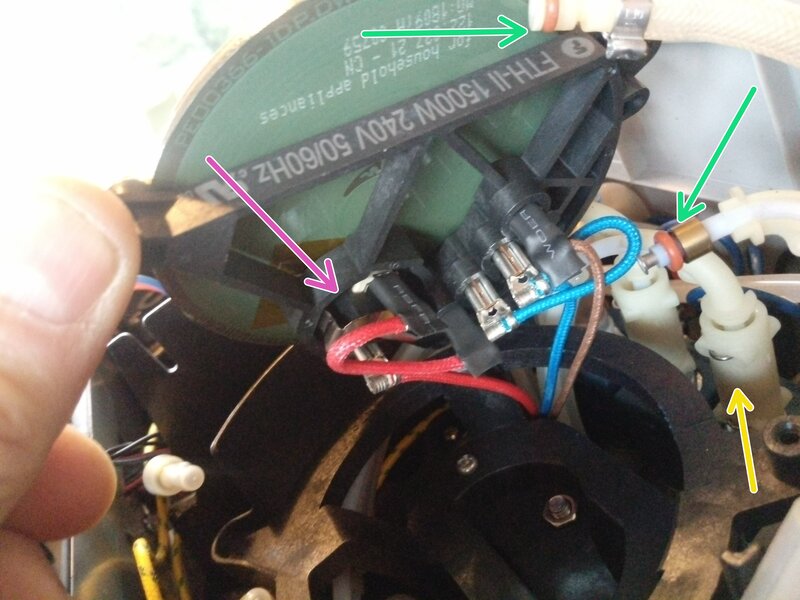
Fill the heating element with descaling solution using a syringe and let it sit. Repeat several times.
Remove the first hose above and below the heating element and descale it. If it is completely blocked, it can be cleared using a bicycle brake cable. To do this, insert the brake cable using a clockwise twisting motion. (Cordless screwdriver)
⚠️ Caution: When reinstalling, do not forget the red seals. Lubricate these with silicone grease (for coffee machines).
Seals.
Cotter pin, easily removed with tweezers. To do this, press the hose in to relieve pressure on the cotter pin.
Temperature switch used as a second safety measure after the temperature sensor on the top of the heating element.
Power Supply

Power supply
Barometer Pressure gauge SAGE Barista Express
Order this genuine spare part for your Sage coffee machine. Fast delivery and expert support from Brewive.
VALVE SOLENOID 240V V397
Order this genuine spare part for your Sage coffee machine. Fast delivery and expert support from Brewive.
Filter gasket 54mm
Order this genuine spare part for your Sage coffee machine. Fast delivery and expert support from Brewive.
Sage SP0100667 Printed heater – Original spare part
Order this genuine spare part for your Sage coffee machine. Fast delivery and expert support from Brewive.
Sage descaler 4x25g for coffee machines
Order this genuine spare part for your Sage coffee machine. Fast delivery and expert support from Brewive.
Conclusion
Follow the steps in reverse order to reassemble your device.
Frequently Asked Questions
How do I access the internal components of my Sage SES880 for descaling?
You'll need to remove the water tank, bean container, and outer shell by following a specific sequence of screw removals, including hidden screws under the plug and behind the tamper. Be careful with the cable connected to the lid and the bean hopper sensor connector. If you need replacement parts during reassembly, Brewive carries components compatible with the Sage SES880.
Where are the hidden screws on the Sage SES880 that I need to remove?
There is a hidden screw located under the plug on the back of the machine, another hidden screw behind the tamper (which you access by pulling the tamper down using its magnet), and a screw inserted from below on the right side that secures the lid. Brewive offers detailed support and replacement screws and fasteners if any are lost during disassembly.
How do I reach the pump and two-way valves for descaling on the SES880?
After removing the bottom screws and prying open the three clips on each side of the lower housing, you can access the pump and the two-way valves mounted on a metal plate. The metal plate must be unbolted (two screws) to reach the hoses on the back of the valves for thorough descaling. Brewive stocks replacement pumps, valves, and seals for the Sage SES880 if any parts need replacing.
Do I need to worry about the grinder when disassembling the Sage SES880 for descaling?
No, the built-in grinder does not need to be removed or serviced as part of this descaling process. You simply close and lift off the bean container, then remove any remaining beans from the housing with tweezers before proceeding. If your grinder does need attention separately, Brewive carries grinder-related replacement parts for the Sage SES880.
What should I be careful about when removing the lid of the Sage SES880?
When lifting off the lid, watch out for the cable attached to it — specifically the connector for the bean hopper sensor, which needs to be unplugged carefully before fully removing the lid. This will expose the heating element, water inlet, hot water outlet, and temperature sensor. If any of these components need replacing, Brewive is a reliable source for genuine Sage SES880 parts.