Philips LatteGo: Common errors and how to fix them
Service Technician at Brewive • February 23, 2026 • 9 min read
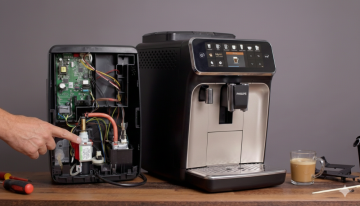
Is your Philips LatteGo coffee machine displaying an error code or not working properly? The most common issues we encounter are errors 01 (clogged funnel), 03 (blocked brew unit), 05 (water circuit problem), and problems with the grinder or LatteGo milk frothing system. Most of these problems can be solved at home within 30 minutes – all you need is proper diagnostics and a few basic parts. In this article, we'll show you the causes, repair procedures, and when it's better to leave your coffee machine to the professionals.
Quick navigation:
What error codes does Philips LatteGo display?
Philips LatteGo series coffee machines (EP2200, EP3200, EP4300, EP5400) use a system of error codes that appear on the display or as flashing indicator lights. Based on our service experience, these are the most common error codes:
| Error Code | Meaning | Severity |
|---|---|---|
| Error 01 | Clogged coffee funnel | ⚠️ Medium – DIY repair |
| Error 03 | Blocked or jammed brew unit | ⚠️ Medium – DIY repair |
| Error 04 | Incorrectly inserted brew unit | ✅ Low – simple fix |
| Error 05 | Water tank or water circuit problem | ⚠️ Medium – DIY repair |
| Error 11 | Coffee machine overheating | ⚠️ Medium – DIY repair |
| All lights flashing | Critical electronics or mechanics error | 🔴 High – service required |
If your coffee machine displays a code other than 01, 03, 04, 05, or 11, it's likely a more serious fault requiring professional service.
💡 Tip: Before starting diagnostics, turn off the coffee machine using the main switch (or unplug it), wait 20 seconds, and turn it back on. A simple restart solves surprisingly many errors – especially after an interrupted cleaning cycle.
Most common causes of Philips LatteGo faults
Based on thousands of repairs we've carried out, we've compiled a ranking of the most common causes of problems with Philips LatteGo coffee machines. These causes apply to the entire series – from EP2200 through EP3200 to EP5400.
| Cause | Frequency | Repair Difficulty |
|---|---|---|
| Blocked brew unit (missing lubrication/cleaning) | Very common (40%) | Easy (DIY) |
| Limescale in circuit (missing descaling) | Common (20%) | Easy (DIY) |
| Damaged O-rings on brew unit | Common (15%) | Easy (DIY) |
| Clogged coffee funnel (ground coffee) | Moderately common (10%) | Easy (DIY) |
| Grinder problem (jammed burrs) | Moderately common (5%) | Medium (DIY/service) |
| LatteGo system – milk leak, weak frothing | Moderately common (5%) | Easy (DIY) |
| NTC sensor / thermostat fault (overheating) | Less common (3%) | Medium (DIY) |
| Power electronics fault | Rare (2%) | Difficult (service) |
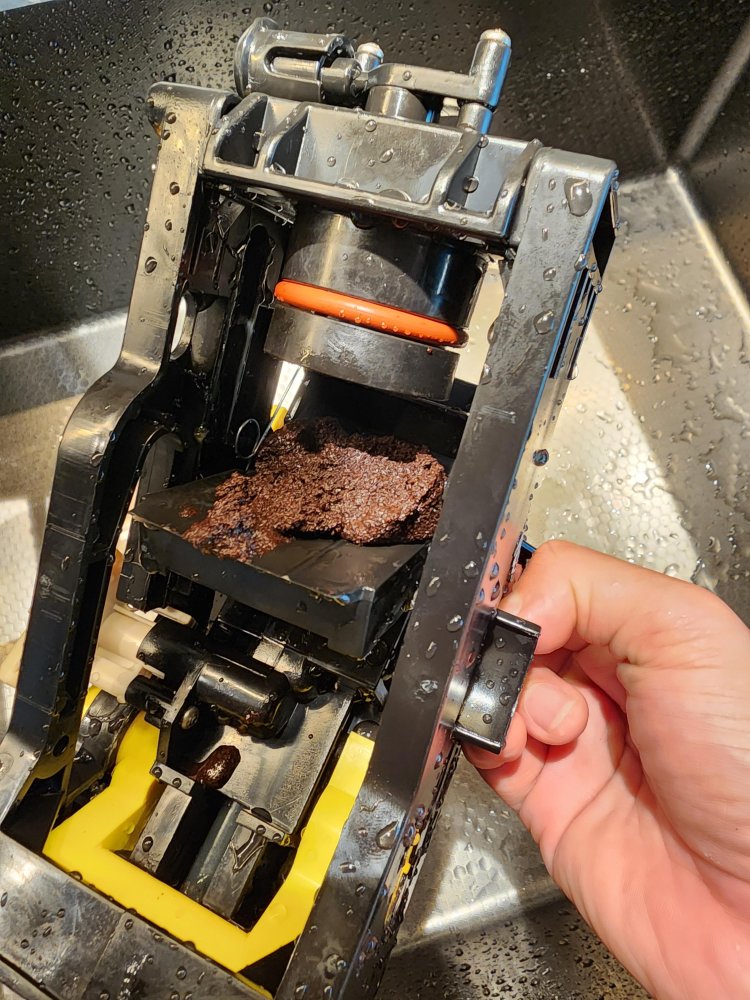
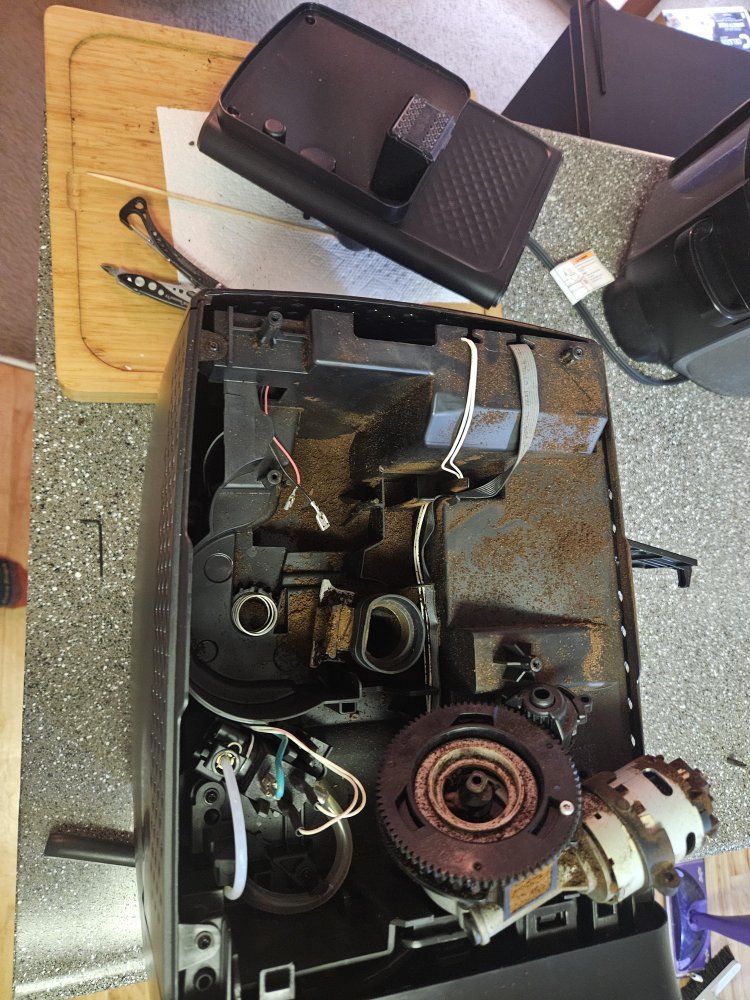
1. Blocked brew unit – cause #1
The brew unit is the heart of every Philips coffee machine. During normal use, it gradually becomes clogged with coffee oils and residue, leading to difficult piston movement, weak pressure, and eventually error code 03. We most commonly see this problem in coffee machines where the brew unit hasn't been cleaned or lubricated for more than 2-3 months.
2. Limescale – the silent killer of coffee machines
Limescale clogs the internal circuit, reduces water flow, and causes error 05. If you use hard water without an AquaClean filter, limescale builds up much faster. Neglected descaling can damage the thermostat or even the entire heating system.
3. Worn O-rings
Small silicone O-rings on the brew unit pin valve wear out or tear over time. The result? Water flows around the piston instead of passing through the coffee. The coffee machine then produces only hot water without coffee extract, or stops pumping coffee entirely.
4. Grinder problems
The Philips ceramic grinder is durable but not indestructible. Oily beans (dark roast) gradually stick to the burrs, slowing down grinding. In extreme cases, the grinder completely jams and the coffee machine produces only water without coffee.
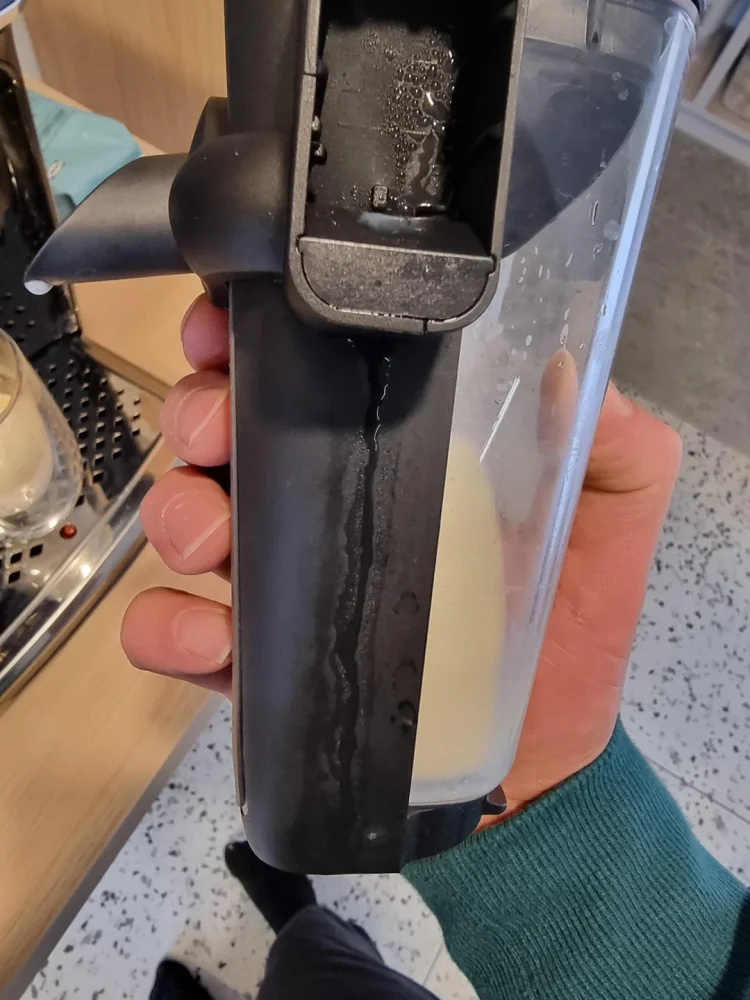
5. LatteGo system – leaks and weak milk frothing
The LatteGo system is an elegant solution for milk frothing, but it requires proper assembly. If the two parts of the LatteGo milk carafe aren't properly clicked together (you must hear a "click"), milk leaks from the bottom hole. It's also important to remove the transport clip before first use.
Step-by-step diagnostic procedure
Before you start disassembling your coffee machine, go through this diagnostic procedure. It will help you identify the cause of the problem without unnecessary intervention.
Step 1: Identify the symptom
- Error code on display – check the table above and proceed according to the specific code
- Coffee machine makes only water without coffee – grinder or O-ring problem
- Weak water flow – limescale or clogged AquaClean filter
- Milk not frothing / milk leaking – LatteGo system problem
- All lights flashing – critical fault, try a restart
- Coffee machine won't turn on / won't heat – NTC sensor, thermostat, or power electronics
Step 2: Restart the coffee machine
- Replace the drip tray and coffee grounds container
- Close the service door
- Turn off the coffee machine using the main switch at the back (or unplug it)
- Wait at least 30 seconds
- Turn on the coffee machine and wait until it fully starts up (no sounds)
- Try making a coffee
⚠️ Important: Never remove the brew unit during a descaling cycle. Always wait until the process is complete. An interrupted descaling cycle is a common cause of errors that then require service intervention.
Step 3: Check the brew unit
- Open the service door and remove the brew unit (press the release button)
- If it won't come out – the coffee machine isn't in neutral position. Turn off and on again as per step 2
- Rinse the brew unit under running water
- Check the O-rings on the pin valve – look for cracks or damage
- Lubricate the brew unit with silicone grease
- Replace and make sure it clicks into place
Step 4: Check the coffee funnel
- With the brew unit removed, open the lid for pre-ground coffee
- Insert a spoon handle into the funnel and move it up and down
- Loosened ground coffee should fall down
- Vacuum up the residue
Step 5: Check the water circuit
- Remove the water tank and check if there are coffee beans or impurities underneath
- If using an AquaClean filter – remove it and try without the filter
- If it works without the filter – the filter needs to be replaced or properly activated (soaking in water before installation)
- Run 2-3 cups of hot water through the dispenser to remove air bubbles
Solutions and repair for individual errors
Error 01 – Clogged coffee funnel
Difficulty: Easy | Time: 10-15 minutes | Cost: €0
- Turn off the coffee machine and unplug it
- Remove the brew unit
- Open the lid of the pre-ground coffee compartment
- Use a spoon handle to loosen the clogged ground coffee in the funnel
- Vacuum up the residue – place the nozzle on the funnel outlet and cover the top with your other hand
- Also clean the distribution channel and holes with a fine needle or pipe cleaner
- Replace the brew unit and turn on the coffee machine
Error 03 – Blocked brew unit
Difficulty: Easy | Time: 15-20 minutes | Cost: €0-5 (lubricant)
- Remove the brew unit from the coffee machine
- Rinse it under lukewarm running water – thoroughly clean the filter
- Check that the piston moves freely
- Lubricate the moving parts with silicone grease for coffee machines
- Let the brew unit dry
- Replace – you should hear a gentle click
Error 04 – Incorrectly inserted brew unit
Difficulty: Easy | Time: 5 minutes | Cost: €0
- Turn off the coffee machine using the main switch at the back
- Remove the brew unit
- Check that the brew unit is in the correct position (neutral position)
- Replace it – push all the way in and make sure it clicks
- Turn on the coffee machine
Error 05 – Water circuit problem
Difficulty: Easy | Time: 15-30 minutes | Cost: €0-10 (filter)
- Remove the water tank and check the space underneath – remove any coffee beans
- If using an AquaClean filter – remove it and try without the filter
- If it works without the filter – the filter needs to be replaced or properly activated (soaking in water before installation)
- Perform descaling with original Philips/Saeco descaler
- Run 2-3 cups of hot water to remove air bubbles
Error 11 – Coffee machine overheating
Difficulty: Medium | Time: 15-30 minutes | Cost: €10-25
- Immediately turn off the coffee machine and unplug it
- Let it cool down for at least 30 minutes
- The most common cause of Error 11 is a damaged thermoblock NTC sensor – this sensor measures water temperature and when it fails, the coffee machine reports overheating even though it hasn't actually occurred. Replacing the NTC sensor is a simple repair
- Check if the water circuit is clogged (limescale blocking flow = actual overheating)
- Perform descaling with original Philips/Saeco descaler
- If the error recurs after replacing the NTC sensor – the problem may be in the thermostat
Coffee machine makes only water without coffee
Difficulty: Medium | Time: 15-30 minutes | Cost: €3-15
- Check if the grinder is grinding – listen to the sound when making coffee
- If the grinder is grinding but the coffee is watery – check the O-rings on the brew unit pin valve
- Replace damaged O-rings – water will then pass correctly through the coffee seal
- Check the grinder chamber – this part breaks during normal use and a cracked chamber causes ground coffee to not reach the brew unit properly. If the chamber is cracked or deformed, it needs to be replaced
- If the grinder isn't grinding – clean the burrs with a fine brush and check that they rotate freely
- If the grinder is jammed, replacing the grinder motor may be necessary
LatteGo system – milk leak and weak frothing
Difficulty: Easy – Medium | Time: 5-30 minutes | Cost: €0-45
- Check that both LatteGo parts are properly clicked together (you must hear a "click")
- Make sure you've removed the transport clip (on a new coffee machine)
- Disassemble the LatteGo – check the small hole on the metal tube, it must be clear
- Clean the silicone and metal parts under running water or in the dishwasher
- If the carafe is damaged – usually the cause is a faulty LatteGo milk carafe that needs to be replaced
- If milk isn't flowing through the correct outlet at all or is flowing directly into the drip tray, the problem is usually the 3-way solenoid valve, which controls the direction of water and steam between the coffee and milk circuits. This valve becomes clogged with limescale over time or gets damaged and requires replacement
Need help with your repair?
Check out our free service manuals and technical documentation for Philips coffee machines. Step-by-step guides to help you repair your machine like a pro.
Required spare parts for Philips LatteGo
Depending on the type of fault, you'll need one or more of the following parts. All are compatible with Philips EP2200, EP3200, EP4300, and EP5400 (LatteGo) series:
| Spare Part | When You Need It | Approximate Price |
|---|---|---|
| Saeco Brew Unit 8gr 5bar | Error 03, worn piston, cracked plastic | €40-70 |
| Pin valve with O-rings | Water without coffee, weak pressure | €5-15 |
| LatteGo milk carafe | Milk leak, damaged carafe | €20-35 |
| Ceramic grinder motor | Grinder not grinding, jammed burrs | €25-50 |
| Grinder chamber | Coffee machine makes only water, cracked/deformed chamber | €10-20 |
| 3-way solenoid valve | Milk/water flows into tray, frothing not working | €20-40 |
| Thermoblock NTC sensor | Error 11, overheating, incorrect temperature | €10-25 |
| Saeco/Philips thermostat | Error 11 (if NTC didn't help), not heating | €15-35 |
| Power electronics 230V (EP5) | Coffee machine won't turn on, random restarts | ~€100 |
| Philips/Saeco descaler CA6700 | Regular maintenance, Error 05 | €8-12 |
💡 Tip: If you're not sure exactly which part you need, find the model number on the label inside the service door of your coffee machine (e.g., EP3246/70 or EP5447/90). With this number, we can advise you precisely.
How to prevent Philips LatteGo faults
Most faults can be prevented with regular maintenance. Here's a brief maintenance plan we recommend based on our service experience:
After each use:
- Rinse the LatteGo system under running water (or activate automatic rinse)
- Empty the drip tray when the indicator lights up
Once a week:
- Remove the brew unit and rinse it under water
- Clean the coffee grounds container
- Check the coffee funnel and clean if necessary
Once a month:
- Lubricate the brew unit with silicone grease (moving parts)
- Disassemble and thoroughly clean the LatteGo system including the metal tube
- Check O-rings for wear
According to indicator (or every 2-3 months):
- Perform descaling with original Philips/Saeco descaler
- Replace the AquaClean filter (after 95 liters of water)
⚠️ Important: Never use vinegar, citric acid, or generic descalers. Philips explicitly warns that using an inappropriate descaler damages the water circuit and voids the coffee machine warranty.
How much does Philips LatteGo repair cost?
Estimated costs for repairing the most common faults – comparison of DIY repair and professional service:
| Fault Type | DIY Repair | Professional Service |
|---|---|---|
| Clogged funnel / brew unit | €0-5 (lubricant) | €30-60 |
| O-ring / pin valve replacement | €5-15 | €40-70 |
| Descaling | €8-12 | €30-50 |
| Brew unit replacement | €40-70 | €80-130 |
| LatteGo carafe replacement | €20-35 | €40-60 |
| Grinder repair (motor) | €25-50 | €60-120 |
| NTC sensor replacement (Error 11) | €10-25 | €40-70 |
| Thermostat replacement | €15-35 | €50-90 |
| Power electronics replacement | ~€100 | €150-200 |
Is repair worth it? New Philips LatteGo coffee machines cost €400-900. Repair is almost always worthwhile – even a complete overhaul costs less than a new machine. For coffee machines under 3 years old, we recommend first checking if the fault is covered by the manufacturer's warranty.
Conclusion
Most problems with Philips LatteGo coffee machines can be fixed at home. The most common faults – clogged funnel, blocked brew unit, worn O-rings – can be resolved for a fraction of the cost of professional service. The key is proper diagnosis and original spare parts.
With regular maintenance – cleaning the brew unit, lubricating, and descaling – you can completely prevent most faults. If you're not sure, don't be afraid to ask. It's better to invest €15 in the right part than to pay €150 for a new coffee machine.

Spare parts for your Philips LatteGo
Brew units, O-rings, pin valves, grinders, chambers, and more parts for all Philips EP series models. Fast delivery and technical support from service technicians.
Frequently Asked Questions
Why does my Philips LatteGo make only water instead of coffee?
The most common cause is damaged or worn O-rings on the brew unit pin valve. Water then bypasses the coffee seal and doesn't create enough pressure for extraction. The solution is to replace the O-rings or the entire pin valve – it's a simple repair for just a few euros.
How often should I descale my Philips LatteGo coffee machine?
Whenever the Calc/Clean indicator lights up. For hard water (above 15°dH), this is every 2-3 months; for soft water, once every 4-6 months is sufficient. If you use an AquaClean filter, the interval is significantly extended. Always use original Philips/Saeco descaler for descaling – vinegar or citric acid will damage the internal circuit.
What does it mean when all lights are flashing on Philips LatteGo?
Simultaneous flashing of all lights signals a critical fault. First try complete shutdown using the main switch and restart after 30 seconds. If the problem persists, the most common cause is mechanical blockage of the brew unit or electronics failure – in this case, we recommend professional service.
Can the LatteGo system be used with another Philips coffee machine?
No, the LatteGo system is designed exclusively for the coffee machine it was sold with. It cannot be swapped with other milk frothing systems or between different Philips coffee machine series.
Why is milk leaking from the bottom of the LatteGo carafe?
Most often because the two parts of the LatteGo carafe aren't properly clicked together – you must hear a distinct "click" when assembling. Also check if you've removed the transport clip on a new coffee machine. The small hole at the bottom of the carafe is normal – it's for milk flow into the frothing chamber.