DeLonghi Coffee Machine Electronics Replacement: Complete Step-by-Step Guide
What you'll need
- Torx TS20 security screwdriver (with hole in the center of the bit)
- Small flat screwdriver for prying covers and releasing connectors
- Camera or smartphone for documentation
- Small container to organize screws and parts
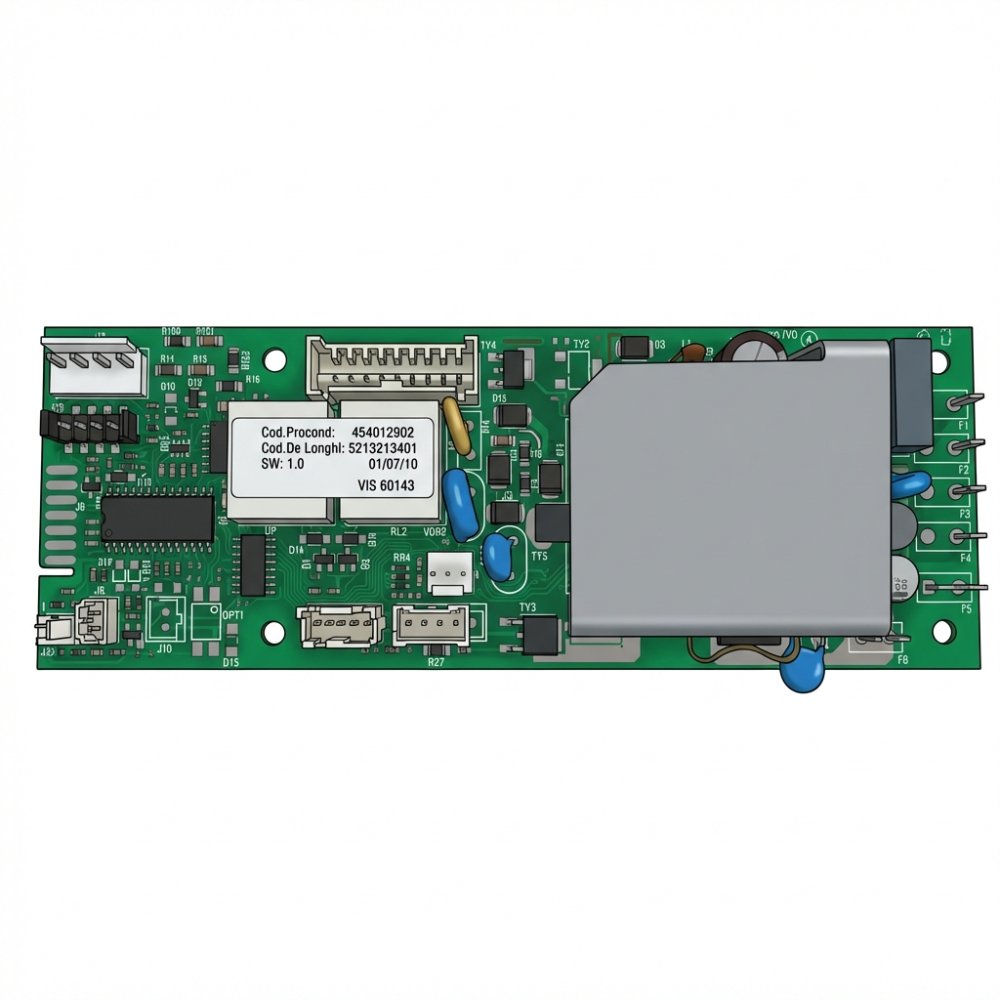
- Replacement electronics board compatible with your DeLonghi model
- Clean cloth or paper towels
How to tell if the electronics board is faulty?
Before you start the replacement process, confirm that the electronics board is actually the problem. Look for these warning signs:
- Won't power on: Machine doesn't respond when plugged in or power button doesn't work
- No response: Pressing buttons has no effect or inconsistent results
- Overheating: Machine shuts down during brew cycle or water is too hot
- Heating element won't turn off: Water heats continuously even when not brewing
- Button failures: Buttons don't respond or work inconsistently
- Inconsistent brewing: Machine loses programming or can't remember settings
- Error codes: Display shows error messages like E01, E04, or E09
If your machine exhibits any of these symptoms, the power board or main electronics likely need replacement. However, it's worth checking that the machine is properly plugged in and the outlet is functioning before assuming hardware failure.
Electronics replacement procedure
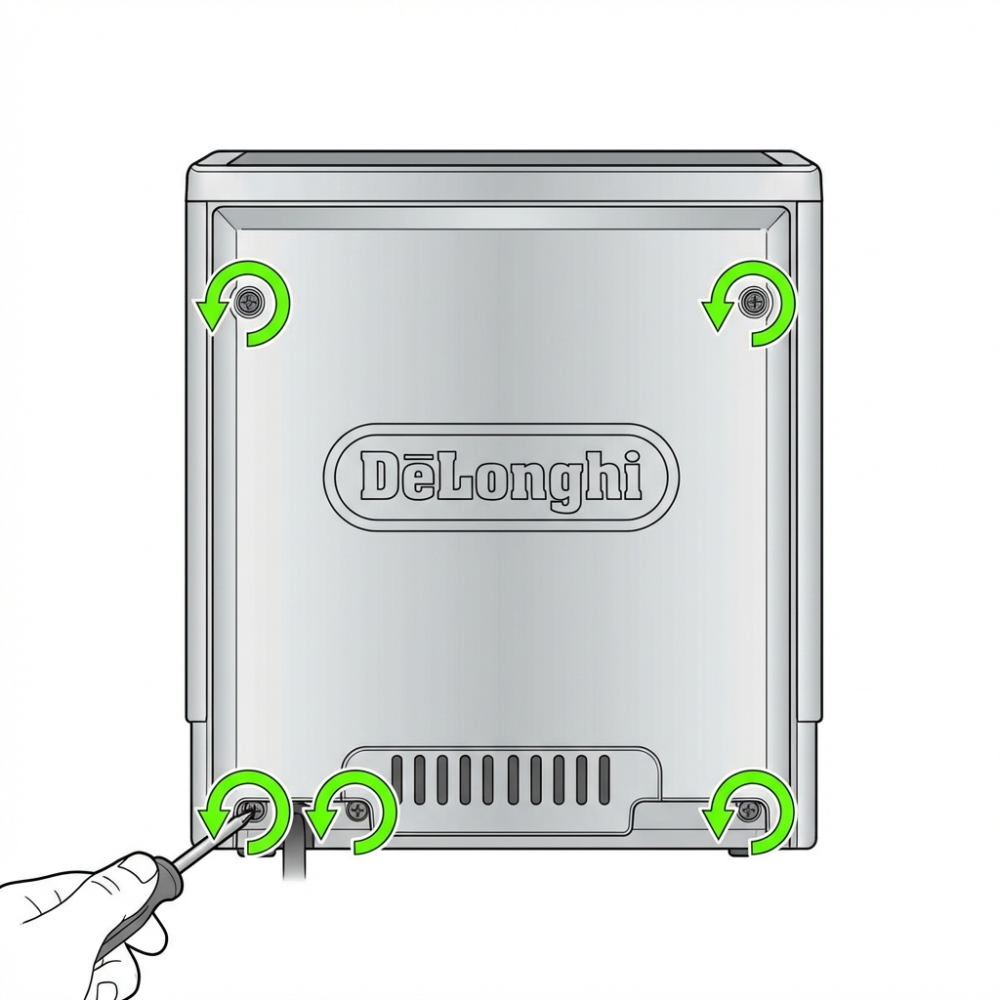
Step 1: Remove the back cover
Start by unplugging your DeLonghi coffee machine from the power outlet. Safety first. Now flip the machine around to access the back panel. You'll see several Torx screws holding the back cover in place. Using the Torx TS20 security screwdriver, carefully unscrew each fastener. Place all screws in a labeled container to prevent loss. Once all screws are removed, gently lift off the back cover and set it aside on a clean surface.
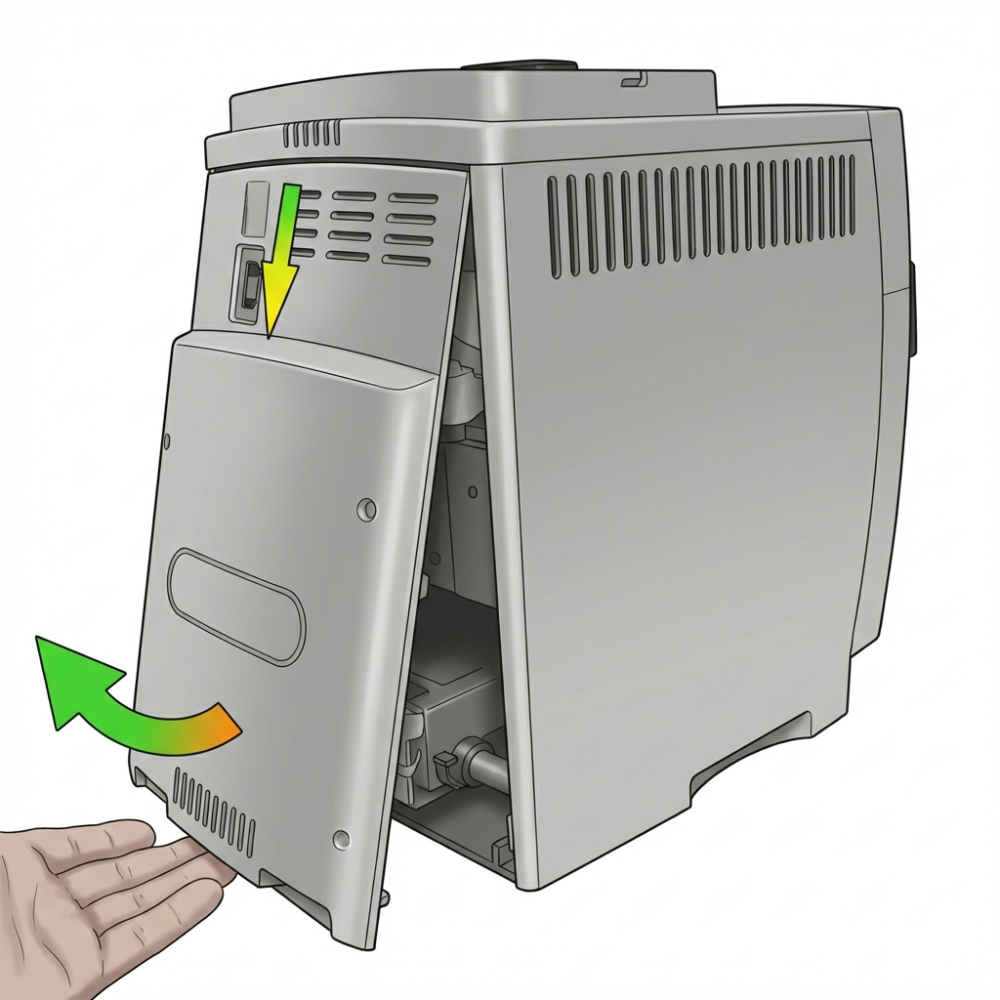
Step 2: Remove the side panels
With the back cover removed, you now have access to the internal structure. Locate the side panels on both left and right sides of the machine. These panels are typically held in place with clips and sometimes additional screws. Gently work a flat screwdriver under the panel edges to release the clips, or if screws are present, unscrew them. Work slowly and carefully—plastic components can crack easily. Remove both side panels completely.
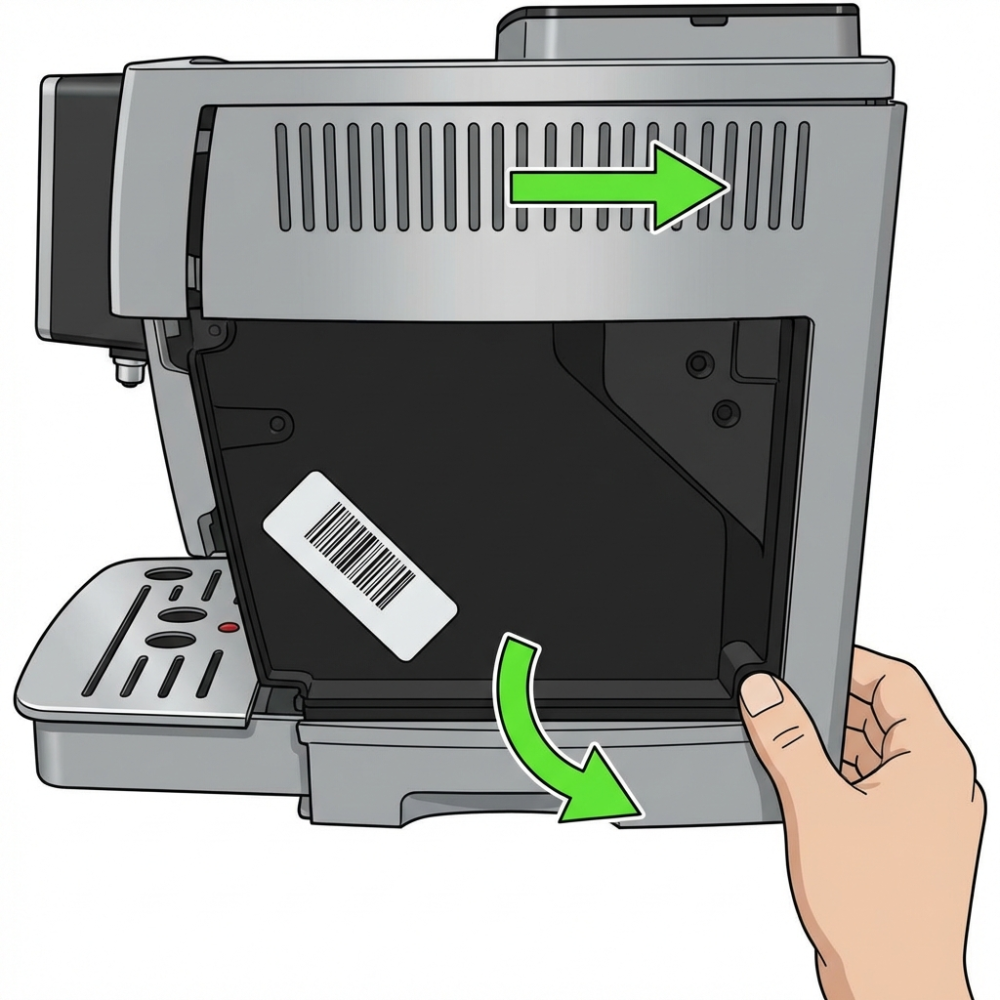
Step 3: Unscrew the electronics board
Now you can see the motherboard inside the machine. The electronics board is typically mounted toward the rear or side of the machine cavity. Locate the 4 screws that secure the motherboard to the chassis. These are usually Torx TS20 screws. Using the Torx TS20 screwdriver, carefully remove all 4 fasteners. Again, keep these organized in your parts container. Once the screws are removed, gently lift the electronics board, but do not disconnect it yet. Set it to the side where you can access the cable connectors.
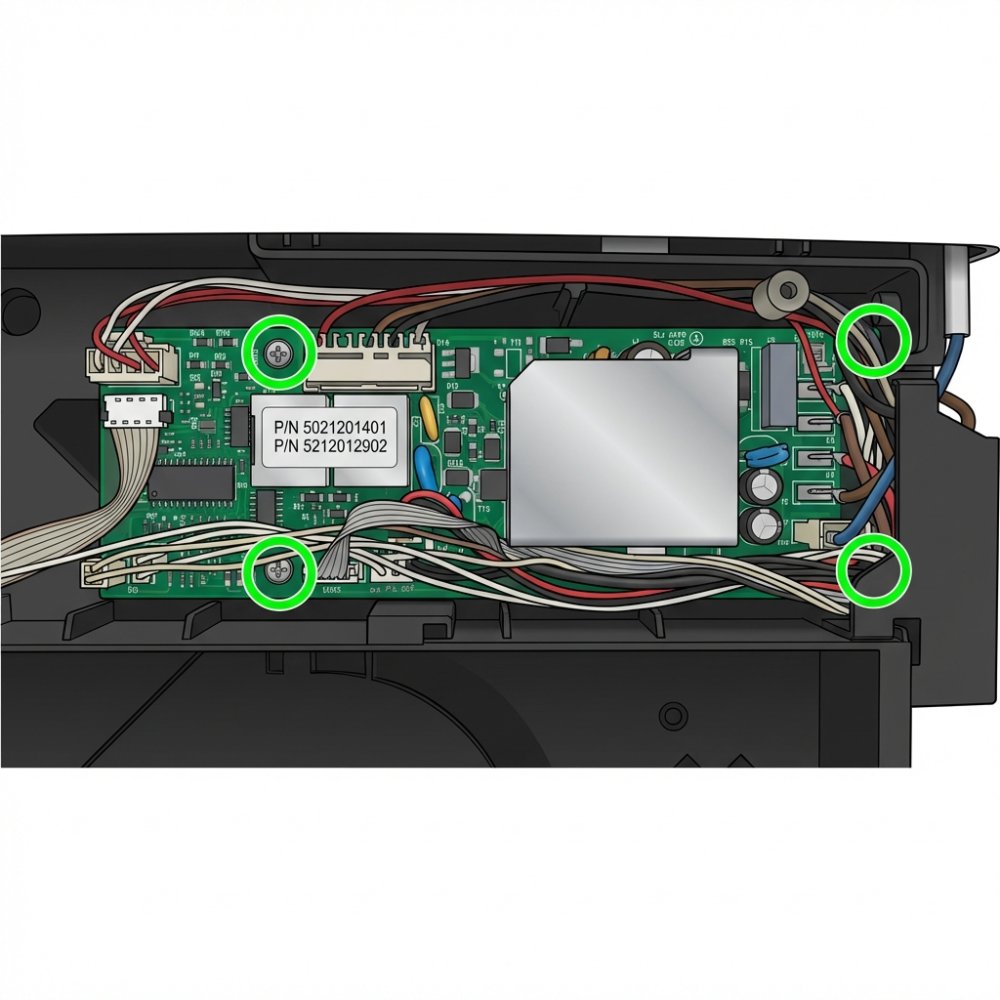
Step 4: Document and disconnect cables
This is the most critical step. Before disconnecting anything, take multiple clear photographs of the cable connections from different angles. Include close-ups of connector locations and orientations. These photos will be invaluable during reassembly. Label your photos or make notes about each connection point.
Once documented, carefully disconnect all cables from the old electronics board. They typically use simple push-fit connectors. Gently wiggle each connector side to side while pulling straight out. Do not force connections or pull on wires.
With the old board fully disconnected, remove it completely from the machine. Inspect the new replacement board to ensure it matches your machine's model and revision. Carefully connect all cables to the new board in the exact positions documented in your photos. Take your time here—incorrect connections can damage the new board or cause malfunctions.
Once all cables are connected, secure the new board with the 4 mounting screws. Ensure it's properly seated and not loose. Reassemble the side panels and back cover by reversing the removal steps. Plug in the machine and power it on to verify the repair was successful.
Where to buy DeLonghi electronics?
Finding the correct replacement electronics board is crucial. Each DeLonghi model uses different components, and ordering the wrong part will result in a non-functional machine. Visit Brewive's DeLonghi electronics and motherboards category to find compatible parts for your specific model.
The most commonly replaced component is the Power Board SW2.2 230V. You can find this and other replacement boards here: Power Board SW2.2 230V for DeLonghi ECAM.
Compatible DeLonghi models include:
- DeLonghi ECAM series (Magnifica S, Magnifica, Dinamica, Eletta, PrimaDonna)
- DeLonghi ESAM series
- DeLonghi ETAM series
Important: Always verify your exact machine model before ordering. You'll find the model number on a sticker inside the water reservoir or on the back of the machine. Electronics are sensitive components and cannot be returned after installation, so accuracy is essential.
Summary
| Step | Task | Time required | Difficulty |
|---|---|---|---|
| 1 | Remove back cover – unscrew Torx TS20 screws | 5 minutes | Easy |
| 2 | Remove side panels carefully | 5 minutes | Easy |
| 3 | Unscrew electronics board (4 screws) | 5 minutes | Easy |
| 4 | Photo connectors, disconnect cables, swap board, reconnect | 20 minutes | Moderate |
| 5 | Reassemble machine and test | 10 minutes | Easy |
Total time: 45-60 minutes (depending on experience level)
Frequently asked questions
Q: Can I return the electronics if they don't fix my machine?
A: No. Electronics components are considered final-sale items and cannot be returned after installation. This is why verifying your machine model before purchase is absolutely critical. Always double-check compatibility before ordering.
Q: What if I unplug a cable and can't remember where it goes?
A: This is why photographing the connections is so important. If you do get confused, refer back to your photos. Alternatively, you can contact Brewive customer service with your photos, and they can help you identify the correct connections before you proceed with reassembly.
Q: Is it really necessary to take photos of the cables?
A: Absolutely. Taking detailed photos is the safest way to ensure correct reassembly. A single misconnected cable can prevent the machine from functioning or damage the new board. Photos take 30 seconds and save hours of troubleshooting later.
Q: What tools do I really need?
A: At minimum, you need Torx and Phillips screwdrivers. A flat screwdriver for prying panels is helpful but not always essential. DeLonghi machines use Torx TS20 security bits (with a hole in the center). Make sure you have the correct bit – a standard Torx T20 won't fit.
Get your DeLonghi running again
A faulty motherboard doesn't have to mean the end of your beloved DeLonghi coffee machine. With this guide and the right replacement electronics from Brewive, you can restore your machine to full working condition. Remember: take your time, document everything, and never force components. For a complete selection of DeLonghi replacement parts and electronics, visit Brewive.com today and find the exact electronics board your machine needs.