


 English (EUR)
 Français (EUR)
 Deutsch (EUR)
 Español (EUR)
 Česky (CZK)
 Polski (PLN)
 Slovensky (EUR)
 български език (EUR)
 Magyar (HUF)
 Română (RON)
 Italiano (EUR)
Saeco XSmall disassembly
Service Technician at Brewive • 2026-06-23 • 3 min read
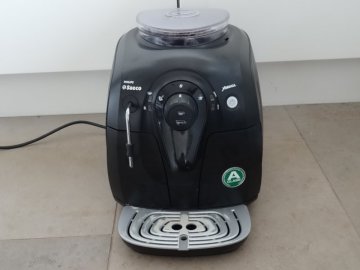
To service the internal components of the Saeco XSmall bean-to-cup machine, you first need to remove the top cover — a large moulded plastic shell that wraps around the top and front of the unit. This guide walks you through the complete disassembly procedure. Once the cover is off you will have direct access to the thermoblock, grinder, brew unit cavity, and other serviceable parts. While you have the machine open, it is also a good time to inspect wear items such as the Saeco brew unit gasket and the PIN valve for SAECO HD and Saeco XSmall coffee machines.

What you need
Difficulty: Moderate | Estimated time: 15–30 minutes
Tools
- TR10 Torx Security Screwdriver
- Plastic opening tool (spudger or pry tool)
Step-by-step repair guide
Step 1
⚠️ Caution: Disconnect the power plug!
💡 Note: Remove the grounds container, water tank, and brew unit before proceeding.
Step 2
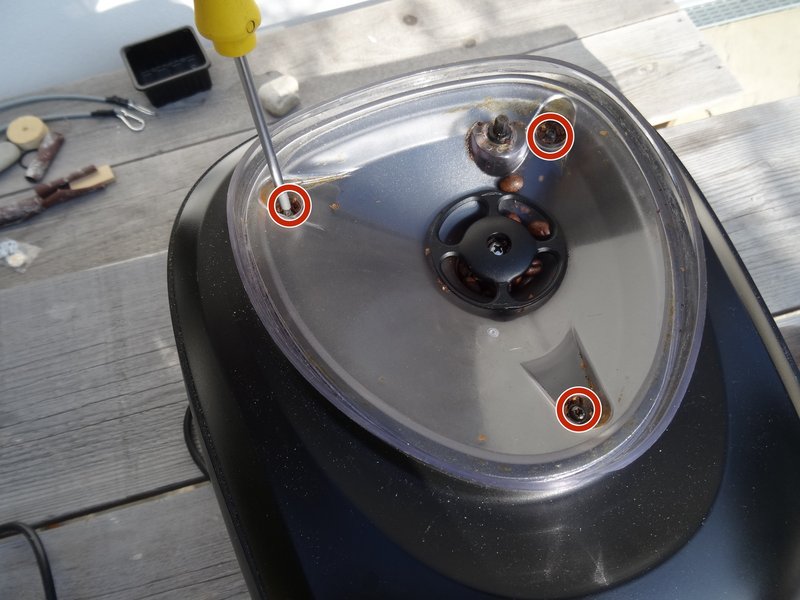

Remove the lid of the bean hopper and empty all coffee beans.
Remove the three Torx T10 screws securing the bean container.
The black plastic finger guard over the grinder burrs is held by a Phillips screw. Remove the screw, then lift out the finger guard.
Pull the bean container straight up and set it aside.
Step 3


Take a photo of the grinder or note the current position of the grind-size adjuster.
Pull the grinder adjuster straight upwards to detach it.
Step 4

Lay the machine on its side. On the underside of the top cover, to the left and right of the coffee spout, you will find two Torx T10 screws. Remove both.
Step 5


The cover over the coffee spout is retained by plastic detent clips. Insert a plastic opening tool at the bottom edge, release the clips, and set the cover aside.
Step 6


The top cover is now secured only by detent clips. Note that two tabs on the front lower edge slot into the bottom plate — keep these in mind when lifting.
Pay attention to the steam pipe (milk frother tube) routed through the front cover.
Begin at the rear seam. Gently pry with a plastic opening tool to release the clips along the edges.
Once the detent clips are free, carefully lift the cover upwards and tilt it diagonally forward. Mind the tabs seated in the bottom plate.
The steam pipe still passes through the front cover. Slide the cover over the steam pipe as you lift it clear of the chassis.
Step 7


The machine is now fully open and ready for service.
The thermoblock (water heater)
The coffee grinder
PIN valve for SAECO HD and Saeco Xsmall coffee machines
Genuine spare part. In stock and ships within 24 hours from Brewive.
Philips Saeco descaler 250ml CA6700
We recommend descaling after every part replacement — protects the new component.
Saeco brew unit gasket
Replace this seal whenever you swap the main part — otherwise you'll be doing the repair twice.
Conclusion
To reassemble your Saeco XSmall, follow these steps in reverse order. Before closing the machine, inspect the Saeco brew unit gasket for wear, and consider running a Philips Saeco descaler 250 ml CA6700 descaling cycle once the machine is back together to keep the thermoblock and hydraulic circuit in top condition.
Frequently Asked Questions
What tools do I need to disassemble my Saeco XSmall?
You will need a Torx T10 security screwdriver, a Phillips screwdriver, and a plastic opening tool (spudger) to safely release the detent clips without scratching or cracking the housing. All three are standard repair tools. If you discover any damaged components during disassembly — such as a worn PIN valve — Brewive carries replacement parts and accessories for the Saeco XSmall.
Do I need to remove the grinder to take off the top cover of the Saeco XSmall?
You do not need to fully remove the grinder, but you must remove the bean hopper and pull the grind-size adjuster upwards. Be sure to photograph or note the adjuster position beforehand so you can restore your grind setting later. If your grinder adjuster or bean container parts are worn, Brewive offers replacement parts for the Saeco XSmall.
How do I remove the top cover without breaking the clips on my Saeco XSmall?
After removing the two Torx T10 screws near the coffee spout and releasing the spout cover with a plastic opening tool, the top cover is held only by detent clips and two front tabs that slot into the bottom plate. Work gently around the edges with a plastic pry tool to avoid snapping the clips. If any clips do break during disassembly, Brewive stocks replacement housing parts for the Saeco XSmall.
Can I repair internal components of my Saeco XSmall myself, or should I call a technician?
Many internal repairs on the Saeco XSmall — from replacing the brew unit gasket to swapping the pin valve — are achievable at home provided you follow the disassembly steps carefully and use the correct tools. The most critical safety step is to always disconnect the power plug before starting. Brewive is a reliable source for genuine replacement parts and publishes guides to help you through the repair process.
Where can I find replacement screws or housing parts if something is damaged on my Saeco XSmall?
Brewive carries replacement parts for the Saeco XSmall, including screws, housing components, and other internal spares. If you strip a Torx T10 screw or crack a detent clip during disassembly, you can find the exact replacements you need through Brewive's parts catalogue.